Showing posts with label DIY. Show all posts

Saturday, December 11, 2010

Budget Review: Decorations

Decorations
Let's be honest: I can't account for everything that was purchased for the purpose of decorating. Occasionally, I'd forget to use our wedding account card on a spool of ribbon or a box of straight pins. I didn't cheat by much, though. This is a rough estimate of what we spent.

For the Ceremony
Shepherd's Hooks
$24 at Joann's

Aisle Runner
$17.50 at Hobby Lobby

Coffee Filter Pomanders
Supplies ran around $15

Photo Book Guest Book
$27 on Shutterfly

Program Holder
 $2 at Goodwill & $5 in supplies

Wedding Wands
Supplies ran around $30

"Love" Word Art
$1 at Michael's plus paint on hand

{© Natosha Benning. All rights reserved. Not for personal use}
{© Epic Image Photography}
Reception

Card Box
supplies ran around $10 or less

Bud Vases
$32 (I purchased WAY too many & they're for SALE)

Table Linens
$232 (these are also for SALE)

Black Picture Frames
$4 at Dollar Tree

Cake Server
$0 - my company makes them

Toasting Flutes
$2 at Goodwill & embellished with supplies on hand

Candles
$38 (purchased too many here as well)

Tissue Paper Pomanders, Lanters & Lights
$0 - my planner did this for us, yay!

{© Epic Image Photography}
{© Natosha Benning. All rights reserved. Not for personal use}
{© Epic Image Photography}

 {© Natosha Benning. All rights reserved. Not for personal use}

{© Epic Image Photography}

Total Cost: approximately $450

Sunday, September 12, 2010

DIY Card Box


This project is super easy and can create a nice accent incorporating your wedding colors. I got a few tips from one of our mock-up artists at work who is a big scrapbooker.  For this, I used the following supplies:

2 blank craft paper hat boxes purchased at Hobby Lobby (30% off day)
5 sheets of 12x12 scrapbooking paper purchased at Hobby Lobby (50% off day)
1 sheet of 12x12 scrapbooking card stock paper (left over from invites)
grosgrain ribbon (left over from bridal shower gift packaging)

x-acto knife, box cutter, cork-back ruler, bone folder, Jade glue (archivers glue), hot glue gun & hot glue, leftover paper from our invitations

I've been working so fast on these projects that I don't take the time to make pictures and I'm really sorry about that because I had been looking forward to sharing them with you all. However, I can tell you the easiest way to make these.

Start by measuring the sides of your largest blank hat box without the lid. Mine was 6" high. The diameter isn't as important right now. I cut 3 of the five sheets of paper to 12 x 7", leaving me enough paper to cover the entire rounded surface plus bleed. As you are gluing the sides with paper glue, cut 3/4" to 1" slits in the paper that is hanging over. Obviously, you don't want to cut right up to the box, just use your best judgment. This will allow you to fold and glue the excess paper over into the box neatly. Do this for both the top and bottom.


I then cut the 12x12 cardstock sheet into the best approximation of a circle I could manage. I used the small box lid to estimate and cut. No one will see the bottom, but it looks more finished this way. I used the bone folder while the glue was still wet to work out any wrinkles the paper might have developed. The box bottoms went quickly and the notching trick works wonderfully.


The lids are trickier because you have to cut holes in the large box lid, the small box bottom and a rectangular slit in the small box top for inserting the cards. This can make wrapping the paper a bit trickier, but with the notching technique, you should have no problem

Cut your holes out first using the box cutter. Again, estimating is fine because no one will see the inside of your box. Then wrap the lids by placing them in the center of a 12x12 sheet of scrapbooking paper, glue down, notch and glue the paper around the edges. On the small box, you will be able to glue to the inside. On the large box, there will be craft paper showing. No big deal because you will cover that with ribbon.

I glued the grosgrain ribbon on with hot glue. I then created a card that says "cards" to match our other stationery. I cut a small slit into the card, ran the ribbon through and under the box lid. I tied it under the lid and then used the hot glue to glue the two boxes together, lining up the holes.


That's it! A card box that matches our wedding theme and colors that is super cute, quick and cheap.

Tuesday, August 10, 2010

Another DIY Project ... Quick & Easy

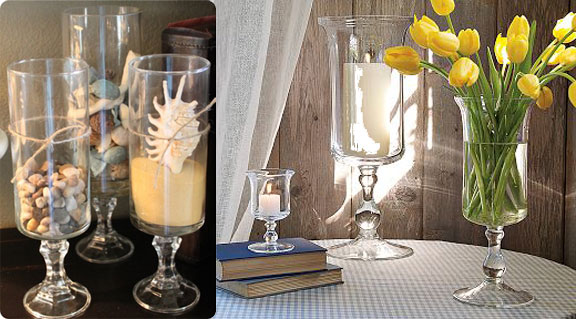
When I saw these featured over at Thrifty Decor Chic, I had to have make them! They are gorgeous knock-offs of the uber-expensive William Sonoma hurricane candle holders. See the comparison:


I traced the original tutorial back to Get Your Martha On, but all you need for one is a "crystal" candle stick holder, a tall vase and epoxy. I purchased all of my glassware at the Dollar Tree in Hermitage for $1 each and I have the epoxy on hand. They also have hurricane vases that swoop out at the edges like the WS versions if you like that.

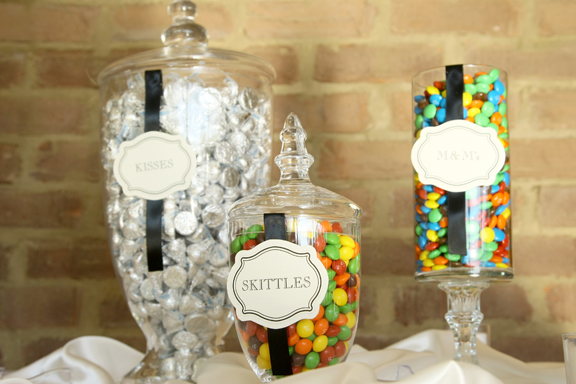
These are inexpensively gorgeous and multi-purpose: my sister wants to fill them with fruit at my bridal shower and they're a super cheap alternative to apothecary jars for a candy buffet, candles, etc for a wedding.

WIth Big Spoon's (and the kitten's) help, here's what we made over the weekend:

Happy DIYing!

Tuesday, July 06, 2010

DIY Wedding Handkerchiefs With Faux Embroidery

Back in the day when I thought our wedding would be all "vintage-y" and whimsical, I fell in love with the idea of making heirloom handkerchiefs for my bridesmaids & Moms & grandmother.

Yeah. Ahem.

Our wedding didn't exactly go that direction and more importantly, embroidery is really expensive. Even when I was willing to pay for it, I couldn't find someone local to do it (who would actually give me a quote, but that's another story). So I did the only thing a girl can do ... I cheated.

That's right, my "heirloom" handkerchiefs have faux embroidery. They ended up costing fractions less. My mom actually hemmed and hand-sewed the lace on to each one. I cut out the batiste and ironed on the faux embroidery letters.

I cut (1) 10" square of ivory batiste per handkerchief and you'll also need lace, thread and these cute little faux embroidery patches from Hobby Lobby. Mom turned the hem twice and hand-stitched them. She then hand-stitched the lace on each one. I picked the best corner, centered up the letter and ironed on as instructed on the package. Easy cheesy.

I do have two fully hemmed handkerchiefs left over (without lace) and a few yards of off-white batiste to sell. Email if you are interested!  SOLD


Tuesday, June 29, 2010

DIY (sorta) Wedding Signs

I must confess that I did not do all of this myself, nor is there much of a tutorial surrounding this project but I wanted to share anyway.

I won a $50 gift certificate to 12 Point Signworks in Franklin, TN while attending the Unabridged Bride workshop and decided to cash it in on three vinyl cut outs. A big THANK YOU to Liza Hippler of Maiden to Married and Murray at 12 Point Signworks for being so very awesome.

I purchased three of these medium sized wooden plaques at Hobby Lobby, primed and spray painted them ivory on both sides. Here's the before from Hobby Lobby's website:


And after I spray painted them:

Then, I carefully added the vinyl cutouts. (I will add the arrows once I know which direction they should be pointing.) Word to the wise: make sure your surface is relatively smooth if you are using vinyl. One sign didn't turn out quite as smooth as the others and I'm experiencing a bit of bubbling with the vinyl. Nothing I can't take care of with a finishing spray, but still. I should have sanded that particular sign a bit before priming. Lesson learned.


Next, my friend Stacey added the picture hanging hardware to the back of the during my Crafts & Cocktails party. I then tied a wide black satin ribbon on each one in order to hang them from a shepherd's hook.

And this is the finished product minus the directional arrow.

Monday, June 28, 2010

Crafts & Cocktails Party

A month or so ago, as I began to stress over how quickly the wedding was is approaching (and my lack of DIY productivity), I decided to invite a dozen or so friends over for a crafting party. I'm very lucky to have so many fantastic friends and a little sister (MOH), most of which had already offered to help me. I could not think of a better way to involve them in this process than by inviting them all over together for some bonding time and of course, drinks and treats!

We failed to get pictures of everyone from early on, but Big Spoon did snap some of us assembling the wedding wands and I snapped a few after the party of our projects. I'm still on cloud nine with how well everything went. We completed the following projects within a five hour span:

• Wedding Invitations (70) - RSVP postcards stamped, assembled and stuffed into envelopes.
• Shower invites (50) - all pieces stuffed into envelopes
• Candy Buffet Favor Bags (100) - tags and spoon charm sewn onto bags
• Wedding Signs (3) - hardware added to the backs
• Wedding Wands (80) - tied, beaded and better than I imagined!

I truly had a blast and I think the ladies did too! Big Spoon was adorably attentive and checked on us from time to time. Miss Jasmin's fiance dropped her off and toted in the most lovely arrangement of hyacinth ever! They smell like heaven.


A million thanks to Beth, Stacey, Bethany, Krista, Jasmin, Jackie, Brittany and Melissa for their hard work. And to Big Spoon for being awesome as always. Thanks for being a part of our wedding process. Love you all!

 {favor bags}

{wedding wands}

{sorted invitations waiting to be addressed}

Monday, June 21, 2010

111 Days to Go


It is safe to say that planning has ground to a slow crawl at this point. We are SO CLOSE to being finished, yet, so far ... I just want to wave a magic wand and have all of my DIY projects completed!

So far this month: 

• I turned 28
• I saw Krista Becom[e] Mrs. Dial
• purchased this expensive-ass bra (after which I realized that I have a Dillard's gift card from my FMIL, so I'll be taking it back and re-purchasing with the gift card).
• took some "nearly naughty" photos! (We won a photography package back in October at a bridal show, so it was the equivalent of a free "boudoir" session. Can't wait to see the photos later in the month).
• registered for gifts at Bed, Bath & Beyond

My "to-do" list for June includes:

• pay lots of attention to Big Spoon
• host "Crafts & Cocktails" party on the 26th - I'm hoping to get all the invites assembled as well as shower invitations and wedding wands.
• complete and submit the music playlists for the ceremony and reception.
• pick up my wedding dress from Sarah Mallory!
• update my planning binder
• screw cleaning because it's not as important as the wedding (I tell myself this over and over, everyday)

Whew! There's a lot to do before the 30th. Happy first day of summer, y'all!

Saturday, May 29, 2010

Paper Advice

I had a lovely reader email me last weekend and ask about DIY invitation resources. She's a savvy bride and has chosen to work with a free template she found online for download. However, she had questions about paper selection and sources.

As a DIY Bride, there are many different ways to create your own invitations.

• Utilize one of the many free downloads found throughout the bridal blog world
• Purchase pre-designed, print-at-home sets at a hobby store
• Design your own!
• Hire a stationery designer! Most freelance stationery designers can customize your invitation vision for a fraction of the cost of major stationers as well as just "jump start" you with a designed template that you will then print, trim and assemble yourself.

Almost all of the above options would require you to purchase or choose paper, which can be overwhelming! There are, of course, many online paper stores that can provide you with numerous color options for mats and envelopes, but I save more money & time by heading down to one of the local paper stores for white & ivory paper for printing. They have direct access to the paper mills in the Nashville area, take in overstock and can in turn pass the discount on to you.

Nashville-area paper stores:
Dennis Paper
Paper Plus

Additionally, I enjoy shopping these  online retailers (most offer samples):
Cards & Pockets
Paper & More
Paper Source
Paper Presentation
Envelopements

Do any of you readers have suggestions? Leave them in the comments!

Thursday, May 06, 2010

DIY Yourself Into Insanity - An Update

Remember way back last April - over a year ago! - when I listed all the DIY projects I was going to do? Yeah, well, we've got about 5 months until the wedding and there are so many of them I can hardly see straight. I've learned, like most DIY brides do, that some things just have to not happen and I'm okay with that.

I will post more of my projects as I finish them. I don't consider all of it DIY because I do a lot of this for a living. However, I do feel like I will be finished with everything in plenty of time (fingers crossed.)

Here's a peek:

• all planning (hoping to recruit a day-of-coordinator)  Check. Did and done.
• invitations, save-the-dates, lined envelopes, programs, table numbers, place cards No seating charts, woo hoo! Screw it. The rest I have under control. The SDs went out ages ago, the invites are printed, mats are trimmed, monograms are punched and assembled. 
• boutonnieres, bouquets and centerpieces  Not happening. I'm leaving this to the expert and offering a hand & two eyes.

• petal toss cones  Replaced by wedding wands.
• farewell bells Not happening.
• cake topper (possibly) DONE!
• a cake stand Not happening because I bought one!

• hand-stamped thank you cards DONE! I love the trash at work!


Still planning on ....
• wedding favor bags, tags and signs
• my veil(s) & a fascinator

• shoe bling
• keepsake handkerchiefs (modified ... I'm cheating.)
• garter (again, cheating because I have an awesome mom).
• customizing the aisle runner ... maybe.
• various other decorations including but not limited to toasting flute & cake server embellishments, program holder, wedding tree guest book print, wedding signs and mason jar wires. 

Friday, April 30, 2010

DIY: Personalized Cufflinks

I love DIYing stuff. Most of the time, you save money and gain the satisfaction of a job well done ... or at least completed. Wedding party gifts can get expensive fast, so I'm crafting the majority of them myself. I should note, however, that the DIY cuff links made from D20 dice was not my original idea, rather, the idea of this talented Etsy/Ebay seller, from whom I purchased a pair of cufflinks for Big Spoon. Through some trial and error, I think I have a nice finished product that is personalized to each guy in or help with our wedding. 

Two of Big Spoon's friends are helping us with the wedding. They play D&D together on Friday nights and we want to give them each a gift that reflects the spirit of the game and can hopefully be worn again in the future.  I also chose to make cufflinks for the best man, who is a UT Longhorns fan. (The only set I did not make are for my brother/groomsman, $5.99 with free shipping on ebay).

• • • • • • • • • • • • • • • • • • • • • • • • • •

Here's where the fun begins. Unless you are attaching some big honking charms or buttons, you will need 10mm cuff link blanks. The 10mm refers to the glue pad. At first, I ordered 15mm. BIG MISTAKE. I ended up losing money because I was dumb enough to send them back instead of reselling them. I do have two sets of 10mm cuff link blanks remaining for additional gifts or to make for resale. 


Supply List: 

10mm cuff link blanks (10 pieces on Etsy)-  $7.75
Longhorn scrapbook charms (12 pieces on Ebay) - $3.39
Orange buttons (3 pack at Hobby Lobby) - $0.98
D20 dice (4 @ $0.80 each at Game Keep) - $3.50
Epoxy - on hand in art supplies
Toothpicks

Step 1: Mix epoxy. This stuff dries fast, so work fast, but carefully, so that you do not get glue on visible areas. 

Step 2: Apply epoxy with toothpick to cuff link blank. 


Step 3: Attach cufflink glue pad to object and allow to dry for at least 5 minutes before moving. Depending on the object, it's a good idea to hold it in place while it dries. **

** For the UT Longhorn cufflinks I glued the charm to the button with epoxy first, allowed it to dry and then glued the entire object to the cufflink blank.


Total supply costs (plus my $5 screw up): $20.62
Cost of gift per person: $6.87

 Aren't the UT Longhorn cufflinks adorable?


Thursday, April 01, 2010

Wedding Stationery Part 1: Wedding Map

Lookie what I did! We now have a wedding map to include with our invitation. I'm going to print our wedding website and parking instructions on the back. This is a quick project; good DIY instructions available here.


Friday, March 26, 2010

DIY: Rhinestone Embellished Monogram Cake Topper

I'm so excited to post my first DIY project for our wedding (the photo book so doesn't count). After deciding to use a monogram on our invitations, I wanted to incorporate an initial on to our cake. It's a plain ivory round cake with a champagne colored satin ribbon around the bottoms of the tiers. We'll stick this little guy on top, surround him with flowers and ta-da! This project was super duper easy.

Before I get started, I'd like to introduce you to our cake plateau. I wasn't thrilled with the limited selection of cake stands at the local rental companies. Hobby Lobby happened to have what I was looking. It's much nicer looking that what I was considering renting and at the price I would have paid to do so.  ( I'll be selling this after our wedding in October, so if you're interested, shoot me an email!)


 Okay, here we go!

Supplies: 


4" inch mirror cake topper
• Various sizes of Swarovski crystals
• Toothpicks
• Tweezers
• Tracing paper and pencil (optional)
• GEM-TAC

Total Project Cost: $24.65

Step 1: Trace your initial onto the paper. You can use this to lay out the look of your crystals before get started (first image below). I found that just laying them on the mirrored B and then snapping a pictured worked better for me (second image below). I simply referenced the pictures later. 


Step 2: Pick a starting point and start gluing rhinestones down carefully with a toothpick. You'll need the tweezers to pick them up and a toothpick to add the glue to the bottoms. A little glue goes a long way. I also used a second toothpick to push them down onto the mirror.


Step 3: This one is important. I only glued down a few rhinestones at a time, then I left them. They dried, I picked the extra glue away and glued down some more. I left those. I repeated this process over the period of a week until I was satisfied with the result. I actually did pick a few off and move them around and this method allowed for that. If you glue them all at once, you'll have a more difficult time moving rhinestones if you see that it's necessary. Granted, you don't have to pick the glue off like I did because it dries clear, but I'm totally anal.


That's pretty much it, folks. It's kinda hard to show how shimmery it is in the photos. If you're on super tight budget, you might consider cutting your initial out of card board in the color of your rhinestones and then using a paper glue to adhere them. Just remember to create a pick so that you can stick it in the cake.

Because I chose to selectively scatter the crystals, I bought fewer rhinestones and saved some cash. Before I got started, I decided to anchor my "design" with larger rhinestones I bought at Joann's for a buck. I used five of them. I surrounded each with the three expensive sizes of swarvoski crystals.

I ordered our "B" from The Knot's wedding shop. It was on sale and I found a $5 coupon on Retail Me Not, making the topper a whopping $0.99. However, the shipping was outrageous. I also tried several different types of glue and in the end, Gem-Tac is your best bet. It dries clear and you can "pick" away the remainder. I picked it up with a Joann's coupon for half what I paid for the glue on Artbeads.com.

I purchased the Swarovski crystals on Artbeads.com. They have good prices and free shipping. I even have some (appx 15) left over that I'm thinking of gluing to my veil. I purchased the XILION Rose style in Crystal: (30) - SS12s, (60) - SS16s and (25) - SS20s. Unless you are infinitely patient, I don't suggest the SS12s. They were so small and a pain in the ass to keep on the tweezers. The other two sizes are great and if you're looking for a third size, go up one from SS20. Obviously, you will need lots more if you're planning to fully embellish your initial, but considering that these things sell for $50 to $150, I'm quite happy with it. 


Thursday, March 04, 2010

Random Thursday Ramblings

Seems like everyone else is doing random updates today and since I missed posting yesterday (oops, forgot about my draft), I'll just subject you to a super-long update post. Hurrah!

Update 1:

I STILL haven't lost any weight. However, I am seeing a difference in "inches", so maybe something is working. I put my wedding dress on this past Saturday for the first time since August and it fit much better than it did the day I purchased it.

Last month, Big Spoon bought a big new gigantic TV for our living room. The older flat panel moved upstairs to our bonus room, as did the Wii, my old DVD player, VHS, yoga ball and mat, and free weights. I had not anticipated this transition for at least another year, maybe two. So I began thinking, "hey, how nice would it be to have my own elliptical machine upstairs so I can watch TV or play music while I work out and not have to spray it down because I don't want to get someone's icky germs or wait for the machine?"

I haven't purchased yet, but I'm giving it some serious consideration. I keep thinking of how awesome it would be to get up earlier to work out, make breakfast and get to work on time. I would definitely get more exercise time in during the week. The gym is a total time-suck.

Update 2: 

I have all these DIY projects laid out to do and no time to do them! At least, during the week I don't have time. I'm trying to remember to take pictures and share the process with you all. I should have something to show VERY soon.

Update 3: 

We are heading out to Hartsville, TN this weekend to check out Tully's Bistro and hopefully book our rehearsal dinner venue. Because our venue is in Gallatin and my family will be traveling from north TN, it would be a hassle to drive to Nashville for rehearsal dinner. We've located two nice restaurants near the venue: Monell's and Tully's Bistro.

More updates to come on rehearsal dinner plans.


Update 4:

I feel the time has come to get my little freelance business off the ground, especially now that the company I work has given me permission to do so. Yeah, I know that sounds weird, but as a full-time stationery designer, I'm supposed to have their permission to do anything else similar. Whatever. Some very nice person at work saw my LinkedIn profile and decided they would help me out by reporting me to management.  Wasn't that sweet? I will be doing less blogging and more designing and wedding tasks over the next few months.

Thanks to Krista @Becoming Mrs. Dial, I feel more confident that I can figure this whole webpage building thing out.

Have a happy weekend!

Sunday, September 27, 2009

The Great Cake Debate


My last post about cake involved a faux cake DIY project. In thinking about all of the DIY projects that I have planned for the next 12 months, some of them had to go away - this one in particular.

My ideas about wedding cake and its importance to our wedding vision has been a hot topic of conversation since our engagement trip. Big Spoon and I both agree that it is not a high priority: its just cake. People eat it (and usually not all of it). How disappointing to purchase a $400 cake and half of it go to waste! However, I've had some reservations (and fear of regret) about not having a "real" wedding cake.

I decided to call around for prices on my lunch break Friday afternoon and found a bakery close by that seems promising. During our weekly "wedding talk" on Saturday, I discussed with Big Spoon that in the way of stress and time, it makes sense for us to consider adjusting this category. We discussed logistics of each plan and prices. I proposed that although the former plan is budget savvy, it's not stress-savvy.

After talking, we decided to visit the bakery and ask a few questions. We both left feeling confident that this decision is close to being final. And if felt great! There has been something nagging me about it forever - and suddenly, that feeling was gone. I felt like another piece of our planning puzzle fell in to place.

Saturday, September 05, 2009

Bubble Veils


I love birdcage veils, but after trying on a bubble veil a couple of times now, I am sold. As crafty my mom and I are, I can't justify a $100-200 price tag. Mom and I will be making my veil, so it will be more personalized and styled to my taste versus off the rack. Yay for DIY! The above pictures are my inspiration. Enjoy!

Wednesday, August 12, 2009

Trimming the Fat and Other Stress

As the months roll by and 10/10/2010 becomes more of a reality than a distant date on the calendar, I have become increasingly obsessed with the budget. I like to think that I am a practical, frugal and sane bride. Big Spoon and I certainly have a handle on our finances and both feel that spending an outrageous amount of money on one day is foolish - for us. We sat down and listed our priorities, compromised and set a budget.

I knew things would come up, I just didn't anticipate how soon.

The wedding dress I have found is a bit more than I wanted to spend, which means the difference that would have paid for undergarments, shoes, accessories ... is now going into the cost of the dress. My parents want to pay for it, but my Dad was laid off from his job and I can't in good conscience let them pay more than a fixed amount.

The venue we are renting provides chairs and tables. That means we provide the linens, and even though I have busted my butt researching prices and contracts, weighing the pros and cons of making them or buying them, we still (at this point) only anticipate affording the table linen - no chair covers. The chairs are ugly, in my opinion, and they bother me. I think this is something I will eventually get over - a minor detail that is not going to majorly effect our wedding day - but that doesn't keep me from fantasizing about them now.

I decided in the beginning that I am perfectly capable of planning this wedding and then handing the reigns over to a friend or day-of-coordinator. What I didn't anticipate is HOW MUCH day-of-coordinators cost! Holy moses! I've asked a dear friend of mine (who is also doing our flowers) to assist and I hope it works out for us. I feel confident that she will do a fine job, I just worry that perhaps she'll need a helper.

So, in my head all the time, I'm thinking about a) the things I can't have b) the things I shouldn't want but do c) or how to cut costs in other areas.

Is this sort of thing normal?

Wednesday, July 22, 2009

DIY Wedding Cake


Big Spoon and I agree that cake isn't necessarily our thing. However non-traditional our wedding might be in some respects, I still love the idea of cutting a lovely wedding cake. After some thought, we decided that it wasn't a priority to spend $200 + dollars on a wedding cake, but still want to have the traditional cake-cutting ceremony.

My grandmother has agreed to bake us her delicious from-scratch coconut cake for the purpose of cutting. This means a great deal more to me than going through a bakery. It means a great deal to me to stay within our budget as well as have many DIY projects.

This week, I remembered a blog post I had seen a few months ago about "faux" wedding cakes. When I saw it, I thought "how silly." We have made the decision to cut Granny's cake and serve matching (not sub-par) sheet cake for a fraction of the cost of a towering, traditional wedding cake. However, I keep second-guessing myself.

"Faux" wedding cake might be the answer I've been looking for. I can create this "dummy" months in advance, if I so choose. I can customize it to fit and coordinate with the "real" tier we will be cutting. I can't think of a better compromise both aesthetically and financially.

Friday, April 17, 2009

DIY, Oh My!


My mama always said "if you want something done right, do it yourself." I'd like to modify it for the purposes of my wedding: "if you want something done right, affordably and have the time, then do it yourself."

These are the DIY projects I anticipate completing for our wedding:

• all planning (hoping to recruit a day-of-coordinator)

• invitations, save-the-dates, lined envelopes, programs, table numbers, place cards

• wedding favors

• my veil

• boutonnieres

• bouquets and centerpieces

• petal toss cones

• farewell bells

• cake topper (possibly)

• a cake stand

• keepsake handkerchiefs (if there is time left)

Top Row (Left to Right): monogrammed handkerchief via {the lace shop}/ wedding bells via {one wed}/ birdcage veil via {Bird Cage Veils}/ cake stands via {Macy's}/ceremony signs via {funkifolkart on Etsy}/wedding boutonniere via {myrakim on Etsy}/petal cones via {Wedding Bee}/wedding cake topper via {laurenalane}

Wednesday, March 25, 2009

Pretty Green Boutonnieres

Ooooh! I want some like these! I just discovered Laurie's blog through {Once Wed}, which is full of wedding inspiration and crafty projects. I think I'll go ahead and order those feathers I talked myself out of on Etsy.

Boutonnières are something I will most likely complete weeks before the wedding and leave a place for a live flower. I'm not entirely sure how to do this. Any suggestions?

Sunday, March 22, 2009

Thrifty Find: Cake Stand

I found a cake stand! My $2.99 Goodwill purchase is a "vintage" wooden stand for a 9"-10" cake. I plan to refinish it and paint it either black or white. (Pictures to follow!)

My cake vision consists of four separate, round, white cake tiers, simply - if at all - decorated. I like the idea of fresh flowers on top of each. Since the tiers will remain separate, I need four cake stands for display purposes.

Wedding cakes can be true works of art - both beautiful and delicious. However, I wouldn't hang a wedding cake on my wall. You eat it. Luckily, Big Spoon and I agree that a good wedding cake doesn't necessarily have to be outrageously expensive.

Have suggestions for Nashville-are bakeries? I'd love feedback :)